Tuesday, October 30, 2012

Fix: Windows 8 Enable Feature DotNET 3.5 Error 0x800F0906

In Windows 8 we can enable “NET Framework 3.5 (includes .NET 2.0 and 3.0) “ and “NET Framework 4.5” as shown below.
01
But once we click Ok and run the wizard, it will try to install .Net 3.5 and  prompt an error saying that, 
Windows couldn’t complete the requested changes.
Windows couldn’t connect to the Internet to download necessary files. Make sure you are connected to the Internet, and press “Retry” to try again.
Error code: 0x800F0906


1
This means using this wizard we cant install .Net 3.5 . Therefore to fix this issue, follow the steps listed below.
  1.  Insert the Windows 8 DVD in to CD ROM or mount the Installation ISO file. (If you have Win 8 ISO in you PC, you can simply right click on that ISO and select mount)
  2.  Use the CMD in run as Administrator
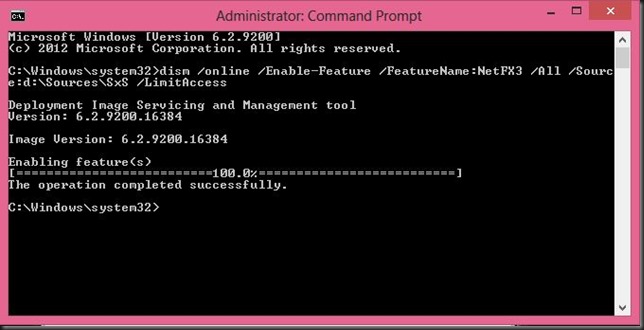
  3.  After that type the following command:
dism /online /Enable-Feature /FeatureName:NetFX3 /All /Source:D:\Sources\SxS /LimitAccess
23
Now your Windows Feature of .NET Framework 3.5  is enabled. To verify go in to Windows Features
0 
Congratulations ..   now you have .net 3.5 enabled on your Windows 8 PC.
 
Make sure to give correct Windows 8 Installation Media Drive Letter in above command. if not you will get below mentioned error.
last


Friday, October 26, 2012

CISCO VPN Error 442 in Windows 8


How to fix Cisco VPN Client error 442 on Windows 8.

If you get below mentioned error massage when you try to connect from Windows 8 computer,


You have to follow these steps to fix that issue.

1..  Go in to Run by pressing  Windows+R   and type Regedit,

2.You will get this window and find HKEY_LOCAL_MACHINE\\SYSTEM\\CurrentControlSet\\Services\\CVirtA

3.  Then select the Display name to modify, and remove the characters from the Value data. (there will be something like “@oem13.inf,%CVirtA_Desc%;Cisco Systems VPN Adapter for 64-bit Windows” )

  •      For x86 PC, change the value data from something like"@oem8.inf,%CVirtA_Desc%;Cisco Systems VPN Adapter” to "Cisco Systems VPN Adapter
  •  For x64 PC, change the value data from something like "@oem8.inf,%CVirtA_Desc%;Cisco Systems VPN Adapter for 64-bit Windows” to "Cisco Systems VPN Adapter for 64-bit Windows”


·   

Now you can connect to your CISCO VPN. No need to restart your PC 

Wednesday, June 13, 2012

How to install MDT (Microsoft Deployment Toolkit) - 06


-->
Adding Office 2010 in to the Task Sequence
        With the previous steps we have already added the Office suite and configured to a silent installation.
Then go in to
1.    Deployment Workbench” > “Task Sequences” > “Win7” > “Properties”.

2.    Access the tab “Task Sequence”. You can check all those options. (Most of them did not appear on the Task Sequence wizard) and change their values (In Properties) or disable specific steps.


3. Go in to “State Restore” > “Install Applications”. Select “Install a single application” > “Microsoft Office 2010”. Click “OK”.


If you want to add more applications later, to the same task sequence, use the same step on this task sequence, select “Add” > “General” > “Install Application”. 


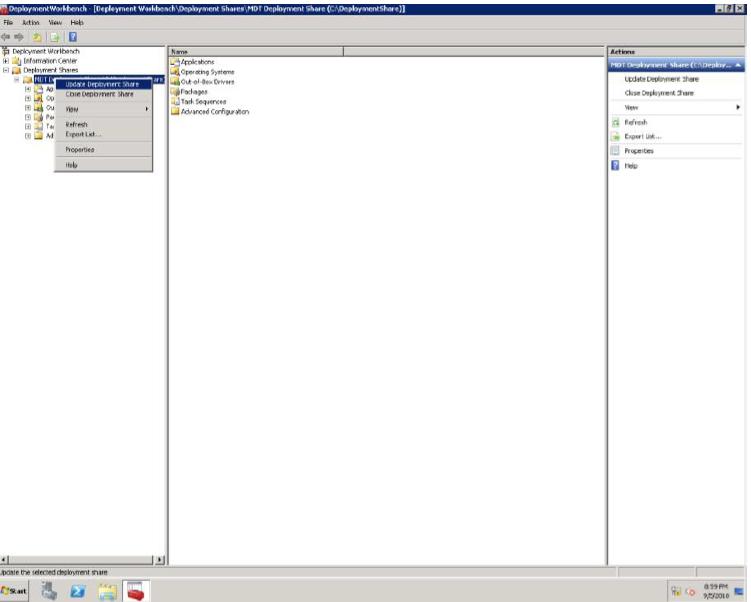
Now installation of Office 2010 is included on the “Deploy Windows 7” sequence and will push in to the client machines silently.  After the configuration, we have to Update Deployment Share

1. Deployment Share >MDT Deployment Share write click and select “Update Deployment Share”

Select “Completely regenerate the Boot image” and click next

Then you will get this summary window

Click Finish to continue. 


Monday, April 23, 2012

How to install MDT (Microsoft Deployment Toolkit) - 05


Adding Applications to MDT 2010: Office 2010 

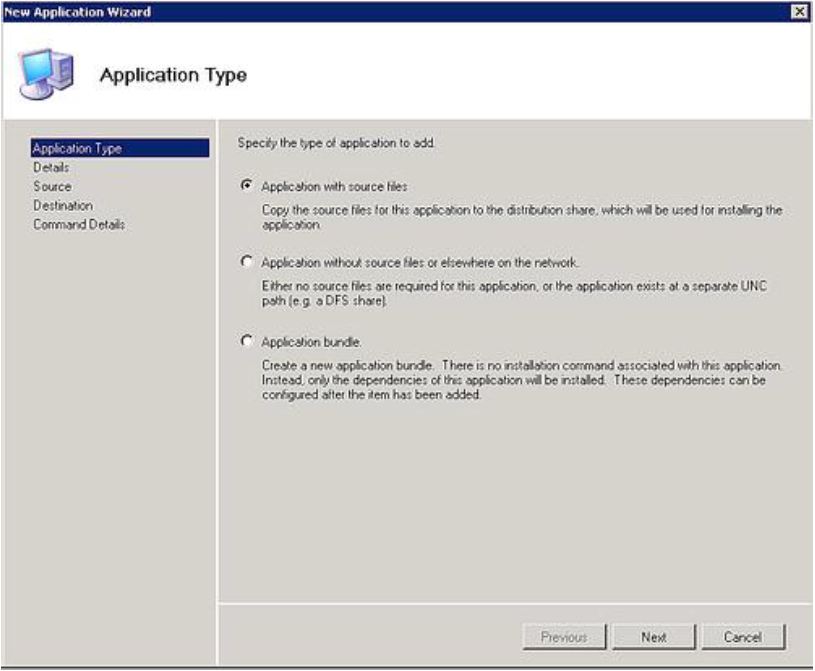
We can add applications using a simple wizard. for that,

1.    Deployment Workbench” > “Distribution Share” > “Applications” > “New”.


2.    Select “Application with source files”.

3.    Complete the data about the application.


4.    Select the “Source Directory”. Since I have it on the hard drive, I’ll check “Move the files to the distribution share instead of copying them”. 

5. Keep the directory name as suggested: “Microsoft Office 2010”.

6. On “Command Details” introduce the name of the executable for Office 2010: “setup.exe” and click on “Finish”. We’ll add the special arguments to achieve silent installations in next steps.


Wednesday, April 18, 2012

How to install MDT (Microsoft Deployment Toolkit) - 04


 Creating a Deployment Task Sequence 

Now we have the distribution share with a clean image of Windows 7, we can create a task sequence to deploy the operating system.
1.    In “Deployment Shares”, expand the deployment share created, right click “Task Sequences” and select “New Task Sequence”. 


2.    Insert a “Task Sequence ID”, I’m using “WIN7”. And a “Task Sequence name”, in my case “Deploy Windows 7 clean image”. Click “Next”.  


3.    Accept the default option in “Template”: “Standard Client Task Sequence”. Click “Next”.

4.    Select the operating system to deploy. Click “Next”. 


5.    The “Product Key” section can be used to not specify a key at this point. Click “Next”.


6. Complete the information about the registered user and click “Next”. 


7. In my case I’m also selecting the local Administrator password. Click “Next”. 


8. In the “Summary” page click “Next”.


9. Once the process is complete we can click “Finish”.


Note: There’s an option of “View Script”, which we can use to retrieve an automated script to use for every time we want to create a similar Task Sequence (we only need to change the values)

10. The process is completed once we update the Deployment Share. In the Deployment Share name, right click and select “Update Distribution Share”. 


11. select the option for “Optimize the boot image updating process”. Click “Next”. 


12. Click “Next” on “Summary”. This process can take a few minutes since it will be creating new files, including the boot images “LiteTouchPE_x86.iso” and “LiteTouchPE_x64” which can be used for the clean operating system deployment. 


The drivers section we can create simple wizard where we can add device drivers into the operating system deployment. This is support “.inf” extension, we can add the components directly; but always remember to use the “Update Distribution Share” once you change the deployment share