Monday, May 28, 2018

How to Start/Stop Azure VMs during off-hours

If you host your VM’s on Azure then you need to think about a ways that you can save something form the solutions that you have selected for yourself or the propose solution for the client.

Here I'm talking about large scale server list which is hosted in the Azure.

This solution provides a decentralized automation option for users who want to reduce their costs by using server less, low-cost resources. With this solution, you can:

  • Schedule VMs to start and stop.
  • Auto-stop VMs based on low CPU usage.
  • Schedule VMs to start and stop in ascending order by using Azure Tags (not supported for classic VMs).

Prerequisites,

* VMs need to be in the same Subscription.

* These regions only supported for the time Australia Southeast, Canada Central, Central India, East US, Japan East, Southeast Asia, UK South, and West Europe.

* If you want the email notification to be setup then select Yes to deploy the SendGrid.

          ** SendGrid is a third-party service. 

Limitations with SendGrid are:

  • A maximum of one SendGrid account per user per subscription.
  • A maximum of two SendGrid accounts per subscription.

To deploy the solution you can follow the below steps,

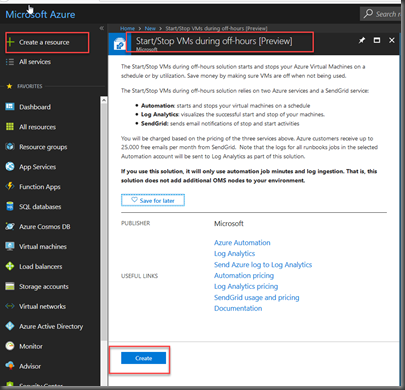
  1. In the Azure portal, click Create a resource.
  2. In the market place page , type the keyword start/Stop and search for “Start/Stop VMs during off-hours [Preview]” resource
  3. Click create.

image

4. then Need to ad the solution, First select the OMS Workspace. If you don't have one create a new OMS Workspace.
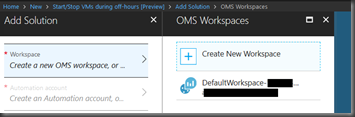
image

You can give a name for the Workspace and select the subscription if you have more,

Then Select the Resource Group and the Location(Available locations are Australia Southeast, Canada Central, Central India, East US, Japan East, Southeast Asia, UK South, and West Europe.)
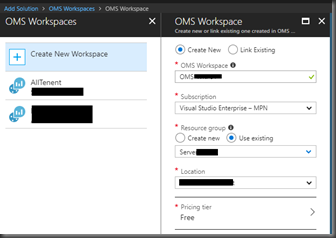
image

5.  Add an Automation Account

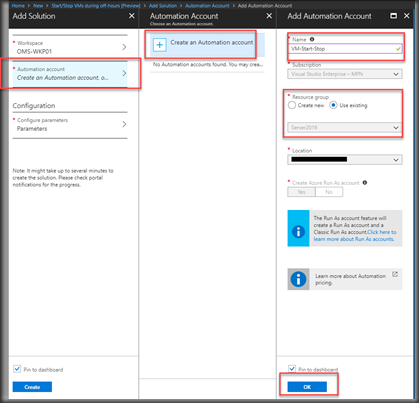
Under the Add Solution page, select Automation account. If you are using a  new Log Analytics workspace, then you need create a new Automation account to be associated with it.

Select Create an Automation account, and on the Add Automation account page, provide the following:

Name : Name for the Automation account

All other options are automatically filled based on the Log Analytics Workspace selected. You can’t modify those options.

SNAGHTML5e0dfb22

6. Add a Parameter.

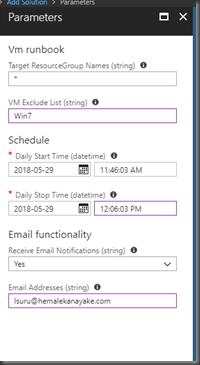
Here you can set the parameters.

Specify the Target ResourceGroup Names. These are resource group names that  contain VMs to be managed by this solution. You can enter more than one name and separate each by using a comma (values are not case-sensitive). Using a wildcard is supported if you want to target VMs in all resource groups in the subscription.


Specify the VM Exclude List (string). This is the name of one or more virtual machines from the target resource group. You can enter more than one name and separate each by using a comma (values are not case-sensitive). Using a wildcard is supported.


Select a Schedule. This is a recurring date and time for starting and stopping the VMs in the target resource groups. By default, the schedule is configured to the UTC time zone. Selecting a different region is not available. To configure the schedule to your specific time zone after configuring the solution, see Modifying the startup and shutdown schedule.
To receive Email notifications from SendGrid, accept the default value of Yes and provide a valid email address.

image

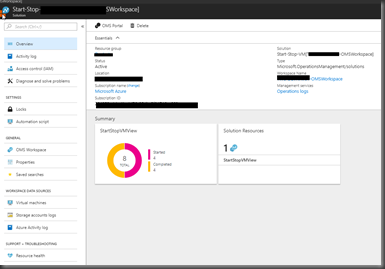
Once click create it will take more than 5 min to complete the task. then you can see the below mentioned dashboard and after few runs you will be able to see the summary of the job which you have created.
image

Wednesday, May 9, 2018

[Solved] CredSSP encryption oracle remediation error

Today after the MS patch installation, most of them experience an issue with the Remote desktop. 

An Authentication error has occurred.

The function requested is not supported.

Remote computer: <#servername#>

This could be due to CredSSP encryption oracle remediation

image

This will be effecting to the Windows Server and the Win 7/10 environments as well.

when I checked the hotfix details I saw that yesterday there were few updates and this will cause the issue.

image

While I'm searching this on the internet found that this is because of the below mentioned three hotfixes.

KB4103725 (Windows 8/10)
KB4103727 (Server 2016/2012)
KB4103718 (Windows 7)

If you have them installed frequently, uninstall them and check.

But as a quick fix you can add a registry value and fix this the details are mentioned bellow,

-------------------------------------------------------------------------------------------------------------

Windows Registry Editor Version 5.00
[HKEY_LOCAL_MACHINE\SOFTWARE\Microsoft\Windows\CurrentVersion\Policies\System\CredSSP]
[HKEY_LOCAL_MACHINE\SOFTWARE\Microsoft\Windows\CurrentVersion\Policies\System\CredSSP\Parameters]
"AllowEncryptionOracle"=dword:00000002

-------------------------------------------------------------------------------------------------------------

Copy and paste this into a notepad and save as a .REG file. Then run the Registry editor as a run as admin.

image

Import this registry file and once that is done you will be able to see that that new registry value is set as below,

image

Restart your PC after that and see the status. Now you will be able to RDP again.

For me this works without restarting the PC.

Note :  This is not a permanent fix. Once the MS Patch is released, need to remove this.

Friday, May 4, 2018

Azure Service Health

Azure Service health gives a customizable dashboard which helps to track the Azure service health status. Region wise technical issues updates and many more.

You can track active events like ongoing service issues, upcoming planned maintenance, or relevant health advisories. When events become inactive, they get placed in your health history for up to 90 days. Finally, you can use the Service Health dashboard to create and manage service health alerts which proactively notify you when service issues are affecting you.

Mainly there are three things tracked and those are,

1. Service issues - Problems in the Azure services that affect you right now.

2. Planned maintenance - Upcoming maintenance that can affect the availability of your services in the future.

3. Health advisories - Changes in Azure services that require your attention. Examples include when Azure features are deprecated or if you exceed a usage quota.

Service Health dashboard is like below,

image

By default this service is active under your Azure subscription and to easy access you can ping that into the dashboard.

To do that Search Health Service under All services and from there ping that into the dashboard.

image

Tracking ID

This will be a problem tracking number and you can copy paste the mentioned URL if you want to send this details to some third party.

image

Summary Download

Here you can download a summary of the problem as a PDF doc and that also can use as a reference or send to the people who doesn't have access to the Azure portal. Or

Can scan the QR code on you mobile and grab more detail about the event while you are travelingWinking smile

image

Best part is to configure the notification. For that you can click on Service Health Alert and configure.

image

If you need more information about the notification profile setup, Please check my previous post about SQL notification setup. Which can be found in http://www.hemalekanayake.com/2018/04/enable-azure-hosted-sql-service.html location.

Wednesday, April 25, 2018

Security Features in Azure Backup


Now everyone is concern on the security if that is hosted in a different place then you should check this first if you enable the backup.

This is a new feature introduced for Azure backup and recovery and help to stop unattended backup deletion.

The following versions will support this Security features:

  • 1. MAB agent – use minimum agent version 2.0.9052
  • Azure backup server – use minimum MAB agent version 2.0.9052 with Azure Backup Server upgrade 1
  • DPM – use minimum MAB agent version 2.0.9052 with DPM 2012 R2 UR12 or DPM 2016 UR2

To enable this feature first go into the Azure tenant which you have Azure backup enabled.

Then search for the “Recovery Services vaults” and Select Properties under Settings.

Under Security settings select Update.


image

Then Click Yes to enable the two factor. Click enable after that.

Note : Once you enable this, you can revert that back. 

image


Then If you want to delete or recover your data from the backup then again you have to come here and generate the Security PIN as mentioned below.

image

Thursday, April 19, 2018

Snapshot operation failed due to COM+ error - Azure Backup.

You will get this error message on your Azure Backups which used to take Azure hosted VMs backup.

This can be due to Azure VM agent communication issue or because of the high utilization of the Virtual machine or an Agent communication issue.

image

To fix this Backup issue you have to login into the Server and restart the,

COM+ System Application service.

Then you can restart the Windows Azure Agent service to refresh the environment.

Sometime you will get the below error. This means the service was hanged or currently used by an application which is having some issue.

You can get a downtime and restart the Server. This will cure this problem.

image


Then, once the server comes online, restart this “COM+ System Application” Service.

Let the backup run after that. 

Wednesday, April 18, 2018

Enable Azure hosted SQL service notifications.


Enable Azure hosted SQL service notifications.

This article shows the step to set up Azure SQL Database and Data Warehouse alerts using the Azure portal. This article also provides best practices for setting alert periods.

To do this you can use OMS or the Azure portal. Here we are using the Azure portal to configure notifications.

You can receive an alert based on monitoring metrics for, or events on, your Azure services. This will be based on the section that you are going to

Activity log events - An alert can trigger on every event, or, only when a certain number of events occur.

Metric values - The alert triggers when the value of a specified metric crosses a threshold you assign in either direction. That is, it triggers both when the condition is first met and then afterwards when that condition is no longer being met.

You can configure an alert to do the following when it triggers:

· Send email notifications to the service administrator and co-administrators

· Send email to additional emails that you specify.

· Call a webhook

Once you go into the SQL instance in the Azure tenant you will see the below mentioned window where you can see the overall performance and the database utilization.

clip_image002

1. To configure the notification you can select the SQL instance then Alerts under monitoring.

2. Then click ad alert.

clip_image004

3. Select the Add alert command and fill in the fields.

clip_image006

4. Name your alert rule, and choose a Description, which also shows in notification emails.

5. Select the Metric you want to monitor, then choose a Condition and Threshold value for the metric. Also choose the Period of time that the metric rule must be satisfied before the alert triggers.

So for example, if you use the period "5 min" and your alert looks for CPU above 80%, the alert triggers when the average CPU has been above 80% for 5 minutes. Once the first trigger occurs, it again triggers when the average CPU is below 80% over 5 minutes. The CPU measurement occurs every 1 minute. Consult the table below for supported time windows and the aggregation type that each alert uses- not all alerts use the average value.

Supported metrics list is mentioned below, Highlighted metrics used in our environment which helps to do the changes before effecting to the live DB failures.

clip_image008

6. Check Email owners... if you want administrators and co-administrators to be emailed when the alert fires.

7. If you want additional emails to receive a notification when the alert fires, add them in the Additional Administrator email(s) field. Separate multiple emails with semi-colons - email@XYZ.com;email2@XYZ.com

8. Put in a valid URI in the Webhook field if you want it called when the alert fires.

9. Select OK when done to create the alert.

It will take few min to activate the alert.


Once the alert rule is created then you can select that and mange that.

  • · Edit or delete it.
  • · Disable or Enable it if you want to temporarily stop or resume receiving notifications for that alert
  • · View a graph showing the metric threshold and the actual values from the previous day.

Can be done by selecting the cleated alert rule.

Tuesday, February 27, 2018

Azure Backup error VM is not in a state that allows backups.

If you get an error in you Azure backup saying “VM is not in a state that allows backups.”

then you can follow below steps to find a solution for this.

in the error window, Recommended action will say,

Please check if VM is in Running or Shut-down state. If VM is in a transient state, wait until it reaches Running or Shut-down state and retry the operation.

image

image

But when you checked, you can see that your VM is working fine an Internet is also there.

No blocking from the Network endpoint as well.


Then how we can start with the troubleshooting. Here I’m listed down the steps which worked for me and hope one or few steps will help you to fix your backup issue if follow these steps.

* First check whether is any blocking in the Network endpoints.

* Then check the VM extensions. VM extension details are mentioned below,

Rerun VM extensions

There may be cases in which a virtual machine extension needs to be rerun. You can do this by removing the extension and then rerunning the extension with an execution method of your choice. To remove an extension, run the following command with the Azure PowerShell module. Replace example parameter names with your own values.

An extension can also be removed using the Azure portal. To do so:

  1. Select a virtual machine.
  2. Select Extensions.
  3. Choose the desired extension.
  4. Select Uninstall.

image

* Then logged into the VM and checked the Azure Windows agent status. If this is not running, start that. If not restart this service and restart the VSS service as well.

Restart the server after this and tried to run the Azure backup. this will cure most of the issue.

SNAGHTML5afa226

* Next thing is to validate the VM agent version. To check this you can follow the below steps.
  1. Log on to the Azure virtual machine and navigate to the folder C:\WindowsAzure\Packages. You should find the WaAppAgent.exe file present.
  2. Right-click the file, go to Properties, and then select the Details tab. The Product Version field should be 2.6.1198.718 or higher

image

If this is not correct then update the  VM Agent binaries. However, you need to ensure that no backup operation is running while the VM Agent is being updated.

Once this is completed, restart the VM and then the backup job and run the backup.

This helps me to fix more than 6 client environment Azure backup issues.

Monday, February 12, 2018

How to view Diagnostic repots in Power BI


Microsoft introduces few solutions to analyze your data and specially the service which is hosted in Azure, you can use OMS to monitor and trigger alerts at the same time Azure notification also a good solution.

But when I'm tried to use this Azure Backup notification feature I had an issue with that and when I check got to know that still they also doing some further development to streamline that.

Then do we need to wait for that or will go with a another solution to achieve our target.

Power Bi is a good solution and you can use this to customize and get your reporting done.

I used this to monitor my Azure backups and enabled between couple of tenants.


To start, you can go into Azure search and search for Power BI Workspace Collection.

image

Then Select the Service from Microsoft AppService.

image

In the next window, you can search for the service that you want. in my case I searched for Microsoft Azure Backup. Then click on Get it now.

image

Give the correct Storage Account name which you have configured for the diagnostic logs.

image

To connect to the Azure backup, you need to give the authentication key. That you can find by go into the correct storage account and select Authentication keys. there you can find the assigned key. Copy and paste that in the Account configuration window.

image

image

Once click Sign in you will get the below information window and it will take more than 24 hour to run the first sync.

image

Once that is done, Power BI reporting is there for you to run and get the reports. In my case I’m using that to monitor my Azure Backups status .. 


Let me know if you need more information …

[Solved] Failed to update diagnostics for …. is not registered to use microsoft.insights

Failed to update diagnostics for …. “is not registered to use microsoft.insights”

This error will be popup when you tried to activate the Diagnostics under Microsoft Azure.  This service will be need to collect the data for Power BI reporting an the OMS log analysis.


image


Solution is mentioned in the notification itself and what you need to do is to  go into

Subscription > Resource Provider  then click on register for Microsoft.insights

image

Now you will be able to enable the Microsoft Diagnostics.

Tuesday, February 6, 2018

How to configure Storage account for Reports in Azure

This article will help you to create reports in  Azure Backup using Recovery Services vault.

Still there is an issue with the Azure Backup notification triggering and if you are concern about getting the Backup notification, then this will be a good solution for that.

The supported scenarios ,

  1. Azure Backup reports are supported for Azure virtual machine backup and file/folder backup to cloud using Azure Recovery Services Agent.
  2. Reports for Azure SQL, DPM and Azure Backup Server are not supported at this time.
  3. Azure Backup Reports are currently not supported in National clouds.
  4. The frequency of scheduled refresh for the reports is 24 hours in Power BI. You can also perform an ad-hoc refresh of the reports in Power BI, in which case latest data in customer storage account is used for rendering reports.
  5. You can view reports across vaults and across subscriptions, if same storage account is configured for each of the vaults. Storage account selected should be in the same region as recovery services vault.

To start the configuration of the Azure backup reports, first you need to create a Storage Account for the Recovery service vault. To  do that,

Go into Hub Menu and search for “Recovery Services vault. ”

image

You can click on the Diagnostics Settings.

image

In the next page, you can enable the diagnostics.

image

Then you can give a Name and select the Archive to storage Account radio button. then Click on Configure Storage and configure a storage to collect the Diagnostics information.

Then Select the Send to Log Analytics radio button and the AzureBackupReport  from there.

If you want you can change the retention period of those reports.

image


image

Once you click Save, You will be able to collect the Azure backup related data in to the configured Storage account and you can use  the Power BI to get the reports. In my next post I'll try to cover that.

Friday, December 15, 2017

How to enable the diagnostics logs for SQL Database in Azure

If you want to monitor your Azure SQL instances through the OMS then you should enable this first. To do that, first go into the SQL Databases and select the correct DB that you want to enable the diagnostics.

Then click Diagnostics settings under Monitoring. As you can see, If the Diagnostics not enabled, then you can click on “Turn on Diagnostics”

clip_image002_thumb[1]

Give a name and select the service that you want to use to get the logs. Here I’m using send to log analytics. Then select the logs that you want to grab and send to your Log analytics.

clip_image003_thumb[1]

Now you will be able to get the data into OMS.

image_thumb[1]

Thursday, December 14, 2017

How to enable Enable Diagnostics Extension - Microsoft Azure

Azure Diagnostics is the capability within Azure that enables the collection of diagnostic data on a deployed application. You can use the diagnostics extension to collect diagnostic data like application logs or performance counters from an Azure virtual machine.

This is  supported for Windows and Linux environments.

To enable this you should go into the Virtual Machine instance that you want to enable the “diagnostics extension” then click on Diagnostic settings 

clip_image002[5]

If this was not enabled, then you will get the above mentioned window and by clicking on “enable Guest level Monitoring” you will be able to enable this.

clip_image004

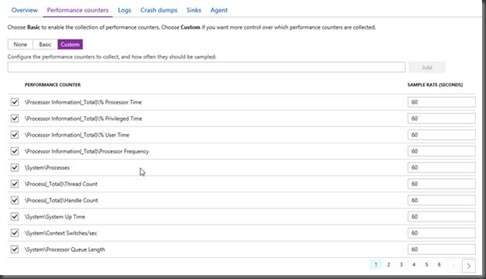
Under performance counter Tab you can select the counters that you want to monitor.

clip_image006

Once you select Custom, then you can do the customization to the counters and add new counters as well.

clip_image008

Under Logs, you can enable the Event logs that you want to get the alerts. If you want to customize them, then you can go with the custom Tab.

clip_image010

Can select the Storage account can be select under the Agent tab and if you want to remove the Diagnostics Agent, that is also you can do here.

clip_image012

Hope this will help you to the Log analytics through OMS. Next post will be more into the OMS fine-tuning.